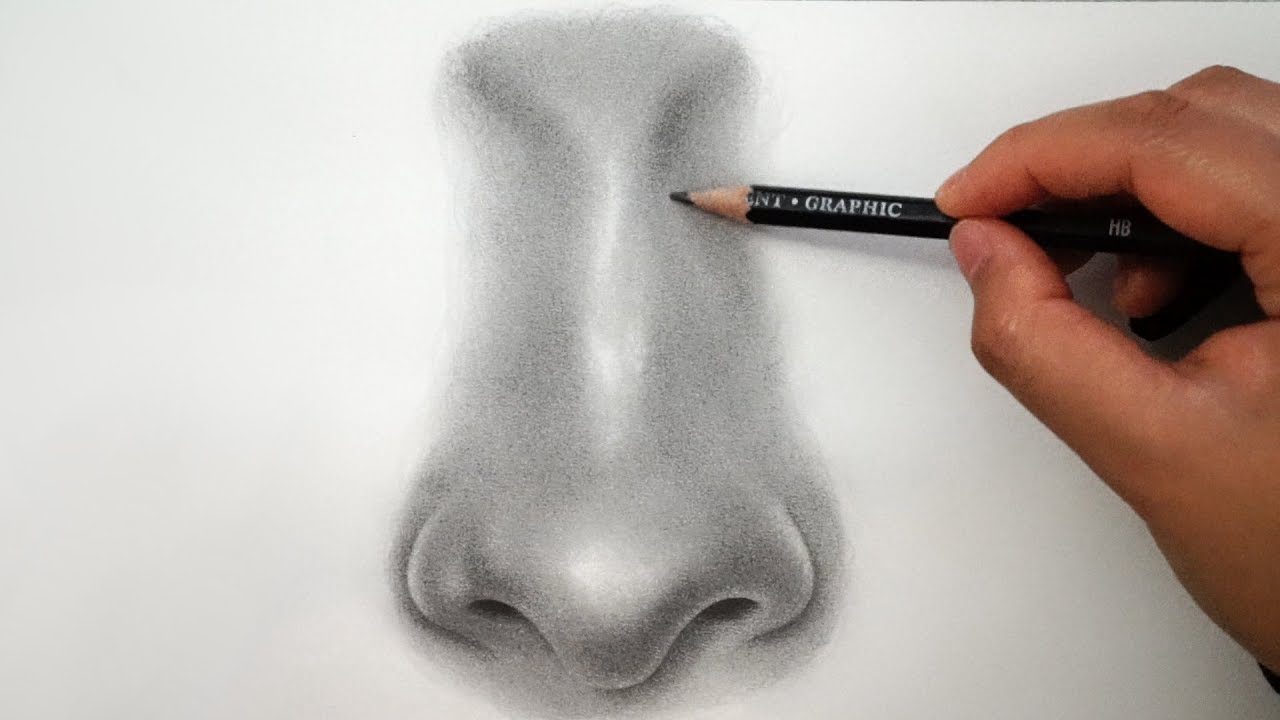
How to Draw a Nose - EASY - RapidFireArt
video description
When you break it down to the different stages of drawing, you'll realise that even the most realistic-looking sketches always start with looking like the most plain, basic, messy sketch that literally anyone can do. As for this video, It starts with drawing a circle- you can do that. Then, draw the nose bridge simply by creating a line with a curve at the end- you can do that. As you build up with the shading and layers, you'll slowly start to realise that your sketch is becoming as realistic as your refrence photo is.
This is what really interested me in sketching 5 years ago. I was always looking at hyper-realistic sketches and thinking -how? how? - Until I tried to really really draw. Ofcourse, my art wasn't good at all because it was just the beginning and I had yet to learn. However, over the years I realised the most important key to realism is layers. Don't ever ever start a sketch by doing shadows RIGHT away. Just like this video, you have to do the process in layers, slowly adding more and more pressure in each layer. Knowing where light and shadow goes is also something that helped progress my art skills. Look at your refrence photo, and highlight the areas where the most light is, and the areas where the most darkest shadows are. That way, as you're building up layers, you can leave less pressure on the places where light is, and apply slightly more pressure to the places with the darkest shadows. If you find that your sketches don't look as realistic as they do in your refrence photo, practice mainly these two things;
1- Knowing where shadows and lights go.
2- Knowing how to slowly add them in layers.
Also, here are some things that generally help a lot when it comes to sketching:
1- using art tools. Like, different shades of pencils such as, 2H (a very light pencil shade mostly used for sketching out the drawing before shading or adding any detail) 9B (One of the most darkest pencil shades that looks almost like black when using. Very helpful to deepen the details in sketches and making them pop more) There are many more that I won't list, but you can find in any art supply store. And also you should use a kneeded eraser. It's an eraser that you can shape into anything, and it comes in handy when you need to erase something very very small and in detail. It can also be used to add highlights by erasing certain parts of the graphite. Also, another useful thing you could use is a sketching blending stump. Its a tool used for blending graphite or charcoal that gives a much more smooth result to your sketch. An alternative is to use cotton buds or simply using tissues. But the blending stump really helps with getting smaller areas that you usually can't go to with cottom buds and tissue.
2- using sketch books. You might think theres no difference between using a regular notebook and a sketch book, but the difference is very huge. Infact, there's a paper type made specifically for acrylic painting, and one for oil painting, and one for watercolours. Just as these have their own paper types, sketching uses it's own type of paper too.
3- Using refrence photos. No, when you look at a photo to get inspiration for sketching you are NOT copying or stealing the photo. You have no idea how much of a difference it can make to use a refrence photo. Here are it's benefits:
- Using refrence photos allows you to understand where to put shadows and light which plays an important part when it comes to realism.
-When you don't know how you should start the sketch and where you should start and what shapes you have to use, refrence photos will help you get the idea of it. Personally, I can't draw a realistic eye without using a refrence photo. If I don't use one I literally don't know how the eye shape should be and where I should put certain details. I mean it's not that I can't completely draw realistic things without refrence photos, it's just that in the end result something is always off and I can't really tell what it is. So using a refrence photo helps detect the problem
3- Keeping old sketch books really helps you to see the progress you've made and motivates you even more to continue your art journey. It doesn't matter if you don't like the end result of your sketch, what matters is that in a year or so, you're gonna want to look back at one of your old drawings to see HOW MUCH you've progressed, but when you realise you've thrown the sketchbooks away you'll instantly start regretting it. I'm speaking from 5 years of personal experience. Trust me, you're going to want to keep your sketches even if they suck and look like 4 year old drawings. It's all about patience.
4- If you don't like the end result of your sketch then take a notebook, and list allll of the things you need to fix and get better at. Then, start sketching a drawing specfically on the thing you've listed and want to progress in. For an example you don't like how the way your shading looks messy or uneven. practice, practice, and practice until you can check it off of the list. Do not stop until you think you've made progress in it.
I'm not suggesting to rush everything super fast and spend 15 hours a day burning yourself out just to practice and get better, no. This is something that will take yeaaaars and years to master. I've been doing this for 5 years years now and I still have sooo much things I want to learn. In all these 5 years I've learnt how to master eyes, nose, mouth and hair and facial structure. I can draw realistic portraits now! I still have a lot of things I want to learn, like realistic animal, human anatomy and drawing different poses, creating my own charecters and realistic landscapes. Just imagine, 5 years it took me to master portraits- how long do you think it's gonna take to get good at alll of these things? exactly. Many many many years. So, don't try to rush. Everything comes slowly but surely. Don't give up. You have a dream you want to follow, and if you give up then you won't get there. Each day you get closer and closer to where you want to be. Ily guys and I hope you found this helpful, you can ask any questions in the reply section and i'll try to answer as much as I can.
Date: 2022-03-14
Related videos


Comments and reviews: 4
iris. _.
it was an alright tutorial i-m doing GCSE art and had to draw a nose and a set of eyes. but i could hardly see the drawing and it was going to fast. really was rapid i guess.
i finished it and got a 3. which isn-t good but stowaway i passed
reply
it was an alright tutorial i-m doing GCSE art and had to draw a nose and a set of eyes. but i could hardly see the drawing and it was going to fast. really was rapid i guess.
i finished it and got a 3. which isn-t good but stowaway i passed
reply
JamNation
OMG! I fully believed I was incapable of drawing! All I needed was the proper guide! The farther you get into it the easier it is. It's almost as if the mind wants to bring the image to l ife!
reply
OMG! I fully believed I was incapable of drawing! All I needed was the proper guide! The farther you get into it the easier it is. It's almost as if the mind wants to bring the image to l ife!
reply
Lilly
I love your videos I-ve have been drawing for long and I can already do loads of realistic drawings but like I think mines good the I look at yours lol
reply
I love your videos I-ve have been drawing for long and I can already do loads of realistic drawings but like I think mines good the I look at yours lol
reply
Rajesh
Nose to hard to draw it's like when u watch onenthes vid it like do this and do that BUT THIs IT SHOWHOW GOD MAD The nose TY
reply
Nose to hard to draw it's like when u watch onenthes vid it like do this and do that BUT THIs IT SHOWHOW GOD MAD The nose TY
reply
Add a review, comment
Other channel videos