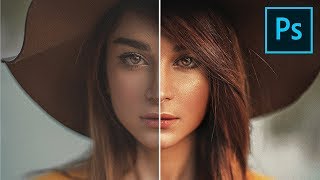
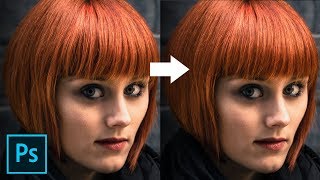
Finally! Sharpen Without ANY Halos in Photoshop!
video description
Date: 2022-07-19
Related videos


Comments and reviews: 20
Chris
I just really wish you would explain how to do the technique you're showing rather than trying to educate everyone on the intricacies of every facet of Photoshop's user interface. You're incredibly talented and knowledgable dude, but I really really wish you would just get to the point already.
reply
Lu
Unmesh. I love you, love you, love you! You help me solved a big problem with more than 40 images at once with one video. All of us, your followers, are soooo lucky to have you here to help us with all your profound knowledge and good/high energy/vibes. Thank you so much (as always!
reply
Unmesh. I love you, love you, love you! You help me solved a big problem with more than 40 images at once with one video. All of us, your followers, are soooo lucky to have you here to help us with all your profound knowledge and good/high energy/vibes. Thank you so much (as always!
reply
moriza
I've done several enhancement with similar problem. In my take Im just using underrated History Brush tool and change their blending type. That's off course much more destructive way than using several layers
reply
I've done several enhancement with similar problem. In my take Im just using underrated History Brush tool and change their blending type. That's off course much more destructive way than using several layers
reply
Astrokhels
This is awesome thanks. Although Ill be applying your tutorial technique on astro photos to emphasize on some key areas. This proves to be an invaluable method with or without some sharpening applied.
reply
This is awesome thanks. Although Ill be applying your tutorial technique on astro photos to emphasize on some key areas. This proves to be an invaluable method with or without some sharpening applied.
reply
Kelmara
Can you do a tutorial of how resize a raw image to a small size for web page with high quality
or
A tutorial of how prepare, resize and save a image before send to a print lab? thank you
reply
Can you do a tutorial of how resize a raw image to a small size for web page with high quality
or
A tutorial of how prepare, resize and save a image before send to a print lab? thank you
reply
TrueFilm
Awesome! Well I was thinking about taking away sharpening from the blurred parts, to retain that beautiful narrow depth-of-field look, and bang: he explains exactly that. Fantastic.
reply
Awesome! Well I was thinking about taking away sharpening from the blurred parts, to retain that beautiful narrow depth-of-field look, and bang: he explains exactly that. Fantastic.
reply
Charles
was listening to your video re sharpening on photo shop must say you explained very well but a bit fast fro biginers. Nevertheless that was a good tutorial. keep it up and thanks
reply
was listening to your video re sharpening on photo shop must say you explained very well but a bit fast fro biginers. Nevertheless that was a good tutorial. keep it up and thanks
reply
Ann
Just an amazing trick for sharpening without degrading the look of the image! THANK YOU! I'll definitely be supporting. because YOU have supported me!
reply
Just an amazing trick for sharpening without degrading the look of the image! THANK YOU! I'll definitely be supporting. because YOU have supported me!
reply
Colin
Nice video. I think it would have helped me relate the techniques more had you re-edited the landscape image from the start rather than the portrait.
reply
Nice video. I think it would have helped me relate the techniques more had you re-edited the landscape image from the start rather than the portrait.
reply
Skai
Thank you! I love your tutoriasl, they are really helpful and I work since 13 years with photoshop but still learn something new, haha.
reply
Thank you! I love your tutoriasl, they are really helpful and I work since 13 years with photoshop but still learn something new, haha.
reply
Kent
For some reason it will not allow me to click Darken or Lighten in the blend mode options. They are both grayed out. Any tips?
reply
For some reason it will not allow me to click Darken or Lighten in the blend mode options. They are both grayed out. Any tips?
reply
hi
Why would we do this instead of using high pass? I'm trying to find the best sharpening method for print, I'm so confused
reply
Why would we do this instead of using high pass? I'm trying to find the best sharpening method for print, I'm so confused
reply
Duenoveuno
I love your videos, I think that they are pretty clear, but maybe you should slow down on the before/after show.
reply
I love your videos, I think that they are pretty clear, but maybe you should slow down on the before/after show.
reply
Leon
Am I the only one who comes here not only for the tutorial but to listen to this man speaking? Gosh! Marry me lol
reply
Am I the only one who comes here not only for the tutorial but to listen to this man speaking? Gosh! Marry me lol
reply
RoKn
Get Topaz gigapixel or sharpen AI or use a free online ai upscaler. It's the only way to actually add in details.
reply
Get Topaz gigapixel or sharpen AI or use a free online ai upscaler. It's the only way to actually add in details.
reply
Lis
Should I sharpen at the 'End' of my editing 'After' I've done all the skin retouch and skin tone or Before?
reply
Should I sharpen at the 'End' of my editing 'After' I've done all the skin retouch and skin tone or Before?
reply
Kukuruz
So much complications on pc photoshop. One tiny mobile phone with Remini app do this with one click lol
reply
So much complications on pc photoshop. One tiny mobile phone with Remini app do this with one click lol
reply
Kasey
I love all your videos! you are literally the only person I will watch to learn photoshop! youre amazing
reply
I love all your videos! you are literally the only person I will watch to learn photoshop! youre amazing
reply
Sherwin
Like the fact that you explain why it works. Very well done, and informative. Can't wait to try it.
reply
Like the fact that you explain why it works. Very well done, and informative. Can't wait to try it.
reply
Add a review, comment
Other channel videos