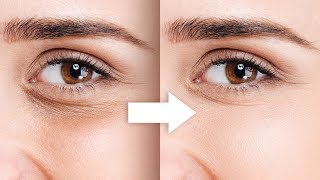
Complete Guide to Removing Blemishes in Photoshop
video description
Date: 2022-07-19
Related videos


Comments and reviews: 14
Martin
Man. you are certainly different to a lot of PS presenters. There's something quite likable about you. Really like your tutorials and the fast pace. A great tutorial to do would be selections. Most tutorials are of subjects on relatively clean backgrounds. Let's get real. the time we want to extract a subject from a background is when the background is bad and usually quite bitty. Would love it if you'd do this and take time to explain the method.
reply
Mrs.
Thank you for the little tips at the end, I'm still new to more advanced editing. I never thought of doing lighting, then blemishes, then more advanced things after. You made a very valid point! I was going to jump in with blemishes first, but adjusting the lighting first makes sense. Thank you!
reply
Shourya
Loved it. The analogy at the end with the cake and sugar really stuck in my mind. For those who didn't make it to the end of the video, the order of processing is: fix lighting in LR (or ACR, blemishes in PS followed by Frequency Separation for evening out skin color.
reply
Loved it. The analogy at the end with the cake and sugar really stuck in my mind. For those who didn't make it to the end of the video, the order of processing is: fix lighting in LR (or ACR, blemishes in PS followed by Frequency Separation for evening out skin color.
reply
Doug
Really great tutorial. You might have mentioned that you were going over moles and freckles in some of the cases and not 'blemishes'. but still, hooray. IMJ some people like to keep their moles as they define their face. Excellent video.
reply
Really great tutorial. You might have mentioned that you were going over moles and freckles in some of the cases and not 'blemishes'. but still, hooray. IMJ some people like to keep their moles as they define their face. Excellent video.
reply
Ravi
Very nice tutorial for Removing Blemishes. This is by far the most interesting video i have come across. It uses different techniques and tips to remove Blemishes. The guy knows his stuff. Very intelligent. Keep up the Good Work.
reply
Very nice tutorial for Removing Blemishes. This is by far the most interesting video i have come across. It uses different techniques and tips to remove Blemishes. The guy knows his stuff. Very intelligent. Keep up the Good Work.
reply
Helena
Hi, thanks for the video, I just have a question; when I circle the blemishes with the patch tool and then try to move them to the right they just snap back to where they came from, how can I make them stay? Cheers!
reply
Hi, thanks for the video, I just have a question; when I circle the blemishes with the patch tool and then try to move them to the right they just snap back to where they came from, how can I make them stay? Cheers!
reply
Duncan
fabulous tutorial. You have a great way of explaining things and the reasons why. very informative. My portraits are already looking much much better. thanks. Rotating clone stamp something i never tried.
reply
fabulous tutorial. You have a great way of explaining things and the reasons why. very informative. My portraits are already looking much much better. thanks. Rotating clone stamp something i never tried.
reply
Rushikesh
Hey, just a quick question. For making the blemishes visible which method is better? A B/W layer with reds and yellows reduced or sine curve method?
reply
Hey, just a quick question. For making the blemishes visible which method is better? A B/W layer with reds and yellows reduced or sine curve method?
reply
Paul
Another great video! Fantastic instruction! I'll be practicing on the sample files to get my technique and workflow as efficient as possible
reply
Another great video! Fantastic instruction! I'll be practicing on the sample files to get my technique and workflow as efficient as possible
reply
Mason
great video thanks. That explains why my image the other day was so faded after retouching then trying to adjust colors and lighting.
reply
great video thanks. That explains why my image the other day was so faded after retouching then trying to adjust colors and lighting.
reply
Hans
Youre quite specific to do blemish control before FS. But why not do the blemish control on the structure layer while doing FS?
reply
Youre quite specific to do blemish control before FS. But why not do the blemish control on the structure layer while doing FS?
reply
Daisy
You have saved my Photography and Editing life! Thank you, Thank You, Thank you! You are simply the best out there!
reply
You have saved my Photography and Editing life! Thank you, Thank You, Thank you! You are simply the best out there!
reply
Jonathan
Never use hard edge brush when using spot healing tool - it creates halo affect on all spots. Very undesirable.
reply
Never use hard edge brush when using spot healing tool - it creates halo affect on all spots. Very undesirable.
reply
fiffrelin
Thank you so much for those tutos. So helpful! I love the tips you give along the way. Thanks thanks thanks
reply
Thank you so much for those tutos. So helpful! I love the tips you give along the way. Thanks thanks thanks
reply
Add a review, comment
Other channel videos