This Tool is Useless... Until You Use it Like This!
video description
Date: 2025-03-30
Related videos


Comments and reviews: 20
Navneet_joshi
I have other uses of BLUR TOOL and SMUDGE TOOL
BLUR TOOL :- it helps to remove aliasing, you see sometimes you bring some images into Photoshop that are actually a screenshot, or any type of image which has aliasing and AI cannot correct it, in that case, take the BLUR TOOL and start applying it on the areas where you see aliasing, you can change the blur value as you like
SMUDGE TOOL :- it creates a manual gradient, or i would say it blends two images. For example you two similar images, and you overlap their edges, but you are still seeing the edges, you can use a mask, but in some cases where the mask reveals the underlying layer, you can use SMUDGE TOOL, select the layer you want to blend, then take the tool and start painting, be careful to use it slowly.
reply
ElderRaceofMan
For concept art the blur tool is perfect to make smoke. Set the repeat to 0, and the strength to between 80-95%. Create a new layer and paint some grey or black hard edged blobs. Then switch to the blur tool using those settings and smear the hard edged blobs again and again, and the painted grey blobs will smear and smudge exactly like smoke or clouds, depending on how you play with the strength settings . If you set the strength to like 95, the effect will keep the smoke or cloud harder edged. Using a custom cloud shaped brush works best, but any roundish shape will work.
reply
3EDI1T0R
Hey Unmesh,
I’m from Bangladesh, and I started my editing journey in 2017. I’ve been following you since then, and every time I watch your videos, I feel nostalgic. You are one of my favorite Gurujis, and I will always remember you. I love you from the bottom of my heart. Thank you for being such an important part of my life. I’ve learned so much from you.
reply
TonyBudenz
This is the only time in Photoshop tutorial history where we need a mature audiences screen at the beginning to click through. Photoshop After Dark: Learning how to Push It In and Pull It Our But, as usual, another great and informative video! I have abandoned those tools for the most part until now.
reply
SamMiller70
I’m still learning but very informative. Would you do an up to date oil and watercolour photograph transform. I’ve followed your older tutorial and downloaded the short cut, however it doesn’t work anything like your examples. I’d love to see you work on more examples. Forever grateful x
reply
I’m still learning but very informative. Would you do an up to date oil and watercolour photograph transform. I’ve followed your older tutorial and downloaded the short cut, however it doesn’t work anything like your examples. I’d love to see you work on more examples. Forever grateful x
reply
PigeonSlayer
Isnt this pretty much .. almost the same as doing a full selection, contract by 1 pixel and feather, paint in black over the small areas where you have issues No need to s--t on the smudge tool, its crazy useful when you do painting and not just photomanipulations
reply
Isnt this pretty much .. almost the same as doing a full selection, contract by 1 pixel and feather, paint in black over the small areas where you have issues No need to s--t on the smudge tool, its crazy useful when you do painting and not just photomanipulations
reply
piximperfect
Oh man! Just when you thought you know enough Photoshop, Unmesh comes up with these EXTRAORDINARY simple tips!
I doubt anyone else knows Photoshop in real depth as much as you do, congrats!!! ...and thank you for sharing your very extensive knowledge!
reply
Oh man! Just when you thought you know enough Photoshop, Unmesh comes up with these EXTRAORDINARY simple tips!
I doubt anyone else knows Photoshop in real depth as much as you do, congrats!!! ...and thank you for sharing your very extensive knowledge!
reply
PetePanaia
I always enjoy your videos. The fact is is that they add value to both the beginner, and to some of the seasoned Veterans as well. Interesting methodology. I have use a similar approach the past. However, you refined the process. Well done sir!
reply
I always enjoy your videos. The fact is is that they add value to both the beginner, and to some of the seasoned Veterans as well. Interesting methodology. I have use a similar approach the past. However, you refined the process. Well done sir!
reply
omnirhythm
A missed opportunity to use the song Inner Circle - Sweat with the lyrics I'm gonna push it-push it some more. I don't know how I will recover from this. Learning a useful use case for Smudge Tool after 20 years will have to suffice, I guess.
reply
A missed opportunity to use the song Inner Circle - Sweat with the lyrics I'm gonna push it-push it some more. I don't know how I will recover from this. Learning a useful use case for Smudge Tool after 20 years will have to suffice, I guess.
reply
Lazer-w
It doesn’t work by me, can anyone please help me
When I follow all the steps it makes the whole area gray and when I set the mode to dark it gets black, also by me is a oval and not a round circle, I would appreciate anyone that can help.
reply
It doesn’t work by me, can anyone please help me
When I follow all the steps it makes the whole area gray and when I set the mode to dark it gets black, also by me is a oval and not a round circle, I would appreciate anyone that can help.
reply
WayniacKT
Great vid brother. I have been doing this for years, but its a great thing to share. Back before the improved select subject, you had to have a quick way to improve the edges. We used the blur tool mostly back then.
reply
Great vid brother. I have been doing this for years, but its a great thing to share. Back before the improved select subject, you had to have a quick way to improve the edges. We used the blur tool mostly back then.
reply
piximperfect
I dont know about you or you kind in the pro sector, but the smudge tool in the artist and conceptual art is the 3 pilras, cores abd must to mastered for what can give you with the brush and erraser LOL!
reply
I dont know about you or you kind in the pro sector, but the smudge tool in the artist and conceptual art is the 3 pilras, cores abd must to mastered for what can give you with the brush and erraser LOL!
reply
tanmayn21
Tbh it's just minute details that doesn't matter in grand scheme of things
Tools are good and usefull..
Still this detailing can be masked using nothing but just the glow and brush tool
reply
Tbh it's just minute details that doesn't matter in grand scheme of things
Tools are good and usefull..
Still this detailing can be masked using nothing but just the glow and brush tool
reply
yufers
You can also fix these masking issues with a brush tool and put in overlay mode. If you want to trim the selection just a touch, select black and paint over the affected area of the mask.
reply
You can also fix these masking issues with a brush tool and put in overlay mode. If you want to trim the selection just a touch, select black and paint over the affected area of the mask.
reply
hoangthi10601
I usually go the lazy route of select mask > contract selection > feather mask, but this seems like a great way to fix out of focus area while still keeping the sharp area intact
reply
I usually go the lazy route of select mask > contract selection > feather mask, but this seems like a great way to fix out of focus area while still keeping the sharp area intact
reply
flow_leit
Damn, all those years, i always used the smudge tool for creative purpose or effects but i never thought it was possible to use it like his. As always, your the goat of PS knowledge.
reply
Damn, all those years, i always used the smudge tool for creative purpose or effects but i never thought it was possible to use it like his. As always, your the goat of PS knowledge.
reply
ishmael9820
Excellent as always. I've also found that using the Burn tool (shadows) will often eliminate fringing round the edges of a masked element and you don't need to be dainty with it.
reply
Excellent as always. I've also found that using the Burn tool (shadows) will often eliminate fringing round the edges of a masked element and you don't need to be dainty with it.
reply
madagreement
Dude, I love your tips but, I get the feeling that you ARE pushing towards the seubscription model by always praising Adobe with their beta features. I dunno. Anyway cheers
reply
Dude, I love your tips but, I get the feeling that you ARE pushing towards the seubscription model by always praising Adobe with their beta features. I dunno. Anyway cheers
reply
AhlquistMediaLab
Using the blur tool in darken mode on mask edges is also useful at times. It softens the edge while pulling in the positive area to get rid of harsh or glowing edges.
reply
Using the blur tool in darken mode on mask edges is also useful at times. It softens the edge while pulling in the positive area to get rid of harsh or glowing edges.
reply
BryceDriesenga
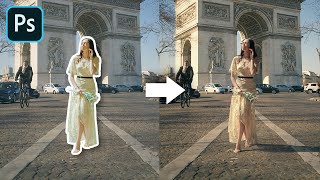
For the arm example at 4:42, it had me wondering what the best technique would be to remove the depth of field blur realistically. Maybe subtle use of generative fill
reply
For the arm example at 4:42, it had me wondering what the best technique would be to remove the depth of field blur realistically. Maybe subtle use of generative fill
reply
Add a review, comment
Other channel videos