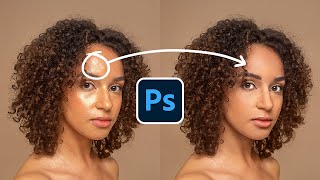
Blur the Background with Perspective in Photoshop!
video description
Date: 2022-07-19
Related videos


Comments and reviews: 15
Arta
Awesome tutorial, didnt know you could add multiple instances of the tilt shift but your placement of the tilt shifts were not right. The parts that should have been in focus were directly behind the girl in shot, they would not have been off screen but about 1/10th of the way from the right for the wall and a bit higher on the wall she is perched on.
reply
Jenn
I've never made it more than 10 minutes into one of his videos without getting upset and pausing for a break. He's so BRILLIANT and it pisses me off to end the amount of time I've spent individually selecting hairs. I know I should just be happy for the future, but it always drives me crazy learning how much time I've wasted!
reply
Jenn
I'm back for finishing it off. This one took me 3 viewings. ;'D I'VE NEVER SEEN THE HAND TOOL ON CURVES! I can't. I can't with this guy. I had no idea how much I didn't know. I took 2 years of classes in 2002, and just thought. I just didn't realize how much has been updated since then!
reply
I'm back for finishing it off. This one took me 3 viewings. ;'D I'VE NEVER SEEN THE HAND TOOL ON CURVES! I can't. I can't with this guy. I had no idea how much I didn't know. I took 2 years of classes in 2002, and just thought. I just didn't realize how much has been updated since then!
reply
La
i love you tutorials usualy but this one is not possible. the blur is not at the good place. The wall is blured where it have to be on focus and in focus where it had to be out of focus. i will not keep this one in mind as you profide so much good stuf; -)
reply
i love you tutorials usualy but this one is not possible. the blur is not at the good place. The wall is blured where it have to be on focus and in focus where it had to be out of focus. i will not keep this one in mind as you profide so much good stuf; -)
reply
creations
thanks to you. Boss, because you help many people in this world. May God always bless you more and more
really you are amzing and thanks to ur parents to give us such nice human beeing.
reply
thanks to you. Boss, because you help many people in this world. May God always bless you more and more
really you are amzing and thanks to ur parents to give us such nice human beeing.
reply
Shreyan
Hi! I have noticed that when we take a picture in a DSLR there is a beautiful line light that differentiates the bokeh background from the subject. Can u show me how I can do it please?
reply
Hi! I have noticed that when we take a picture in a DSLR there is a beautiful line light that differentiates the bokeh background from the subject. Can u show me how I can do it please?
reply
WendyMarie
How can anyone choose to thumb this down? He even gives away free hair brushes, saving us all kinds of time and trouble. Thank you, Unmesh, you are amazing.
reply
How can anyone choose to thumb this down? He even gives away free hair brushes, saving us all kinds of time and trouble. Thank you, Unmesh, you are amazing.
reply
Jsfrog58
He is great, I agree, though sometimes he moves way too fast for my unskilled brain. Changing the playback speed to 0. 75x helps with that.
reply
He is great, I agree, though sometimes he moves way too fast for my unskilled brain. Changing the playback speed to 0. 75x helps with that.
reply
Refaya
I have been watching your tutorial for almost 7 years now. I love how much I am still learning from these tutorials! Thank you so much!
reply
I have been watching your tutorial for almost 7 years now. I love how much I am still learning from these tutorials! Thank you so much!
reply
Vaskar
Does every control point (in tilt -shift blur) need to be controlled separately? In the video you have controlled one of them.
reply
Does every control point (in tilt -shift blur) need to be controlled separately? In the video you have controlled one of them.
reply
Andy
Nice. Please i have one question. I want to know whether you Shoot Your tutorial video in HLG 3 using Your A7iii camera thanks
reply
Nice. Please i have one question. I want to know whether you Shoot Your tutorial video in HLG 3 using Your A7iii camera thanks
reply
Daniel
The hair brushes linked in the description do not contain all of the brushes that Unmesh is using in this video.
reply
The hair brushes linked in the description do not contain all of the brushes that Unmesh is using in this video.
reply
Rosie
thank you for this amazing tutorial. i love that you explain the why AND the how. Your tutorials are amazing. :)
reply
thank you for this amazing tutorial. i love that you explain the why AND the how. Your tutorials are amazing. :)
reply
Shane
i download brush link but dont get same brushes as you is there different link on site i only get 3 brushes
reply
i download brush link but dont get same brushes as you is there different link on site i only get 3 brushes
reply
itech
The moment I assumed to know how to apply bokeh, Unmesh comes along and shows me how it's done properly.
reply
The moment I assumed to know how to apply bokeh, Unmesh comes along and shows me how it's done properly.
reply
Add a review, comment
Other channel videos