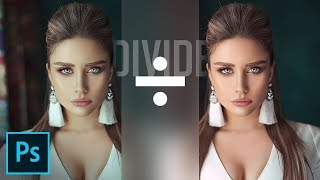
Gray Layer for Dodge & Burn is STUPID!
video description
Date: 2022-07-19
Related videos


Comments and reviews: 19
James
Unmesh I enjoyed watching you conduct your experiments. However, without going into too long of an explanation the reason a gray layer was used was that in earlier versions of Photoshop you simply werent able to paint on a blank layer.
And BTW, the whole technique of painting on the 50% gray layer was developed because the dodge and burn tools were notoriously bad, they didn't work well at all.
In addition, we used to change the blend mode of the brush tool itself, for example, we used lighten blend mode for lightening, and darken blend mode for darkening.
Years ago pretty much by accident I realized you could paint on a blank layer.
But you are correct, approach problem solving using scientific methods, just because you've always done something one way doesn't mean that a better way may be discovered, stumbled on, or developed. keep an open mind.
Best.
reply
Angela
Hi! I first want to say I love your videos. I know I'm a little late to watching this one, but I think the answer to why the gray layer is so widely used, in addition to the reasons you mentioned is that because if you use the dodging and burning tool, not the brush with white or black, it doesn't work on a transparent layer. There have to be some pixels on the layer for it to affect. The gray layer comes in because we don't want to work on the original layer for non destructive purposes. I like the brush technique with transparent layer when I don't need as much control, but if I need to dodge/burn something and limit it to just the highlights or just the shadows of the original image I will use the D&B tool with the gray layer.
reply
Jeff
2 parts to this. I actually use apply image in my dodge and burn on top of the gray layer. And invert the image on a second gray layer. I have always assumed this was to target more specifically highlights on one layer and shadows on another. Is this really necessary? 2nd on the difference between blank and gray layer, on a gray layer instead of that complicated process to erase the strokes, couldn't I just swap my brush color paint in the opposite color to reverse an unwanted effect to its desired levels?
reply
Natasha
I learnt to use the actual dodge and burn tool on the grey layer, and I have used it for a lot of fantasy paintings that requires A LOT of dodging and burning. And I was told in numerous tutorials that focused on fantasy artwork was that you could see your work in the grey layer. Also using the smudge tool can almost erase mistakes, because you smudge the grey back into the other colours. But I do believe it's so you can see your work and identify the layer easily when working with numerous layers.
reply
Kekitus
In that case, the solution can just be to create two layers. A grey layer with a Soft Light blend mode for checking, and on top of that an empty layer with a Soft Light blend mode too. The first layer won't affect anything and will basically be transparent, but doing it that way you have all the advantages of painting on an empty layer (easier to erase, but you can see what you did if you turn off everything except the two layers you created. The 50% grey layer acts as a checking layer basically.
reply
Hasnat
Erasing is the only issue in grey layer that gives transparent layer an advantage even though grey layer is better for visibility of changes. This getting back to 808080 is really annoying, even if selecting from swatches. Instead, why dont we have two layers? One soft light layer filled with white and another filler with black, both covered with inverted mask. All the changes will be easily visible and dodge and burning will be in their separate layers instead of overlapping in one.
reply
Shaden
Its used to be a problem in the earlier versions of photoshop back in 2007 and 2008 it wouldnt match colors like whats happening with u now it would come out on the skin as black and white the gray layer was as a reverse to the gray the tools are creating on the skin, earlier versions of photoshop had different logic to their programming, anyhow people as always kept using the gray layer even though this problem was fixed in photoshop back in 2010. Thats the answer ur looking for.
reply
Lance
Because a 50% gray, when set to soft light transform IS transparent. So in this application, both options result in the same net results. I think, but don't hold me to this, that the reason we started using the base gray is a hold-over from when PS transforms worked differently years ago. Also, having a filled layer made it easier (again, this info may be dated) to apply other effects and treatments that may not work as well with partially transparent content.
reply
Karrie
I just experimented with both and the one thing I like better about using the gray layer is having some control regarding where the adjustments are made by changing the drop down menu for shadow/Midtones/highlights.
I found that if I need to erase on my gray layer, I just put a white mask on it and paint it black.
I also created a grey brush preset and an action as shortcuts to erasing a dodge & burn.
reply
Jean-pierre
Thanks for this clear video. I was using the grey layer method in the past but now i really think that the transparent layer is much more convenient. For the unique little drawback it's always possible to put a grey layer under the transparent layer; this grey layer can be hide when dodging and burning and unhide when we want to check the strokes involved in the correction.
reply
GP
put a layer filled with 50% gray (normal mode not soft light) just under the one (the empty one) you use for D&B. whenever you want to see the result on the empty layer, you just have to activate the 50% gray layer under. this way you benefit from doing D&B on an empty layer and you use a 50% gray layer to visualize the results. That video is an eye opener for me. thanx a lot.
reply
Kyle
very interesting. regarding the one benefit of using a grey layer - that you can see the subtle work, you can get the same effect by having a grey fill layer underneath that you can turn on to see. It's one extra step once, but not a big deal.
Is it possible that there are ways that filters, smearing etc interact with the grey layer differently than the transparent one?
reply
Daniel
Hey, Unmesh! I have another answer to your question of why it can be better to use the 50% gray layer. The first reason I can think of is that with the dodge/burn tool, you can select the range (shadows, highlights, and midtones) to dodge/burn. With the paintbrush method, you're adjusting all areas equally because the paintbrush applies a single color across the stroke.
reply
carl
I wonder how much distance it would make using a mask like when you did exposure blending. I have Lumenzia as a plugin and it has a dodge and burn feature that you can use with luminosity masks to target specific areas. I can still manually select those areas and then use a white layer or black layer but the grey layer may be easier. I don't know. I'm still learning.
reply
Daniel
If you want to have the cake and eat it too, just create 2 layers inside a group. The one on top is transparent and the other one below is 50% gray. Both are set to normal and the WHOLE GROUP is set to soft light / overlay. That way you can use the eraser on the transparent layer while still retaining the ability to put the group to normal and see the work you did.
reply
Adam
You use a grey layer because you can use a dodge tool on it, not because you use a standard brush. Using dodge/burn tool gives more control over the process (you can use settings like Protect Tone. So there's a use for the 50% layer approach - is it better? It depends on you. I never use white/black brush to doge and always use the dodge tool - so for me it is.
reply
kahan
You can dodge and burn on a transparent layer with a brush, but you'll compulsorily need a 50% gray layer when you want to do the process using dodge/burn tools instead of the brush, because using those both tools will make no change on transparent layers but will make changes to a 50% gray layer, according to the algorithm of blending mode being used.
reply
Svein
The reason is historical. Photoshot file format added transparency in non-mask layers at an early version, but NOT at the first version. So everyone had learned to use 50% gray before transparency was added, and people continued doing what they were used to. New users saw the masters were using a gray layer, and. monkey-see-monkey-do. etc.
reply
Mark
I'm late to the game and my thought was already mentioned a few comments down, a solid color layer underneath the transparent layer to switch on and off as needed. But, having watched this video just now, I still have to give a shoutout to you for your integrity as a teacher and a shoutout to the Andrew McCarty for asking you the question!
reply
Add a review, comment
Other channel videos