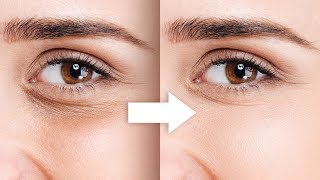
Complete Guide to Clone Stamp Tool in Photoshop
video description
Date: 2022-07-19
Related videos


Comments and reviews: 20
Roger
Best and most thorough explanation of the Clone Tool and it Control Panel that I have found on the internet - Although I have been using PS for 22 years, and use the Clone Tool quite frequently, I learned a couple of things through your video that I never fully understood before. Only one other thing which I think you should have mentioned - adjusting the hardness/softness of the clone tool brush (because basically it is a brush. Since I am involved in retouching images of classic antique cars, I use the Clone Tool frequently and in doing so, I need to adjust its hardness/softness frequently. A very soft brush does not pick up minute details whereas a harder brush (usually about 64-66 hardness) will pick up minute details. I am sure you are aware that by holding the Ctrl+Option keys (On a Mac) while moving your mouse left to right and visa versa, this will adjust the size of your brush and by holding these same keys and moving your mouse forward and back and visa versa, this will adjust the hardness/softness. Just a suggestion. Thanks my friend for your detailed explanation.
reply
Roger
Hint: Create a blank layer directly above the Layer that you wish to clone [ from ] and make sure you choose Current and Below in the clone tool menu bar. Now do all your cloning from within the blank Layer. This way you will not be altering the original image in any way and if you make a major mistake when cloning on the blank area you can always delete the blank layer and start over. Additionally add a Layer mask to the blank layer. This way you can paint with black on the Layer mask to obscure certain mistakes or areas which you decide not to include in the cloned area. When finished cloning, simply select the layer on which you did your cloning and right click and choose, Merge down. (this procedure also offers you the ability to make certain adjustments to the cloned pixels, ie: lighten, darken, adjust hue & saturation, etc)
reply
Allen
Hello Unmesh - I have a problem maybe only you can help me with. I created a graphic for my acoustic guitar. I downloaded a flat image and blew it up. The created the graphic on the guitar image - making it a true fit. But now - I can't figure out how to size the image so that it will print out on the laser printer to the proper size for my guitar. I know the layout is right and to size, but have no idea how to print it out so that it will not be too small or too large for the guitar surface area. Man - you're my last resort - the printer people cannot even answer the question. Can you help?
reply
stekjes
Have watched the whole video waiting to hear from you the shortcut to rotate the patched area, but you forgot to mention. No problem though, that was yet another great tutorial and I learned about the blending modes that I didn't know there were also blending modes exactly for the clone stamp tool.
reply
lioz
Photoshop is an absolutely amazing world and interesting, but usually the tutorials about it are not so mind blowing, to say the least. Unmesh you became exclusively a brand. almost the only brand I could listen to. thank you man. with admiration from Israel.
reply
Photoshop is an absolutely amazing world and interesting, but usually the tutorials about it are not so mind blowing, to say the least. Unmesh you became exclusively a brand. almost the only brand I could listen to. thank you man. with admiration from Israel.
reply
Arthur
Amazing tutorial, some of the terms used are unknown to me, but will get there eventually. Have a B&W photo and want to colourise the foreground grass and background trees, whats the best procedure and or tool thanks, perhaps a tutorial?
reply
Amazing tutorial, some of the terms used are unknown to me, but will get there eventually. Have a B&W photo and want to colourise the foreground grass and background trees, whats the best procedure and or tool thanks, perhaps a tutorial?
reply
T.
thanks bro, with lots,
ur the only only reason for my further interest in photoshop and its all activities and stuff!
that's literally really more than super to say.
thank u every much, and continue to support us.
reply
thanks bro, with lots,
ur the only only reason for my further interest in photoshop and its all activities and stuff!
that's literally really more than super to say.
thank u every much, and continue to support us.
reply
shizuka
Hey Unmesh! your tutorials are awesome! They helped me to observe the photo that needs to be retouched more precisely. I like the way you describe everything. Keep making such good tutorials.
reply
Hey Unmesh! your tutorials are awesome! They helped me to observe the photo that needs to be retouched more precisely. I like the way you describe everything. Keep making such good tutorials.
reply
sylvia
thanks so much for all of your videos! I have learned so much from this specific instructor, he is always so detailed and leaves nothing unanswered like a lot of other tutorial videos do.
reply
thanks so much for all of your videos! I have learned so much from this specific instructor, he is always so detailed and leaves nothing unanswered like a lot of other tutorial videos do.
reply
Puneet
Why we havent use normal blend mode clone here, how it make difference from Lighter blend mode clone? In face photo and tatto cant we use normal blend mode?
reply
Why we havent use normal blend mode clone here, how it make difference from Lighter blend mode clone? In face photo and tatto cant we use normal blend mode?
reply
aviv
thank you so much, you are the boss. your videos so relevant always and its so much fun to back here every time cause we can trust you that the answer is here
reply
thank you so much, you are the boss. your videos so relevant always and its so much fun to back here every time cause we can trust you that the answer is here
reply
Анастасия
Man you do such an awesome job explaining such things. I totally will not suffer so much from now using a clone stamp tool on plaid shirts.
reply
Man you do such an awesome job explaining such things. I totally will not suffer so much from now using a clone stamp tool on plaid shirts.
reply
Geir
Thanks for the video. But what is the tric for getting the cloned area as sharp as the area you clone from? I only get blury areas when cloning: -(
reply
Thanks for the video. But what is the tric for getting the cloned area as sharp as the area you clone from? I only get blury areas when cloning: -(
reply
Patrick
That anticlockwise idea was timely, it is a problem Im just trying to solve. Thank you, I didnt know the anti-clockwise option was available.
reply
That anticlockwise idea was timely, it is a problem Im just trying to solve. Thank you, I didnt know the anti-clockwise option was available.
reply
eitakkatieable
Fantastic video. By the way, I rewound 23: 38 multiple times to hear your laugh there. It's super contagious and had me laughing. :)
reply
Fantastic video. By the way, I rewound 23: 38 multiple times to hear your laugh there. It's super contagious and had me laughing. :)
reply
Yousif
I remember that there was a shortcut to rotate the source clone without using the angle clone source panel but I can't remember what it was
reply
I remember that there was a shortcut to rotate the source clone without using the angle clone source panel but I can't remember what it was
reply
Ayan
you are the best teacher ever, have been seeing your smile for so long now, you seem to be as familiar to me as my next-door neighbor: -)
reply
you are the best teacher ever, have been seeing your smile for so long now, you seem to be as familiar to me as my next-door neighbor: -)
reply
Utkarsh
plz give the credits of song as well. which song is this. Also where can I get more details about this tool about its different modes?
reply
plz give the credits of song as well. which song is this. Also where can I get more details about this tool about its different modes?
reply
Alessandro
Perfect tutorial! I am literally learning more now that I'm seeing all your videos than ever before. Thank you a lot my friend!
reply
Perfect tutorial! I am literally learning more now that I'm seeing all your videos than ever before. Thank you a lot my friend!
reply
HoursOfNothing
who wants to know the shortcut of rotate clonestamp so you can see directly and not sliding the angle button. just reply
reply
who wants to know the shortcut of rotate clonestamp so you can see directly and not sliding the angle button. just reply
reply
Add a review, comment
Other channel videos